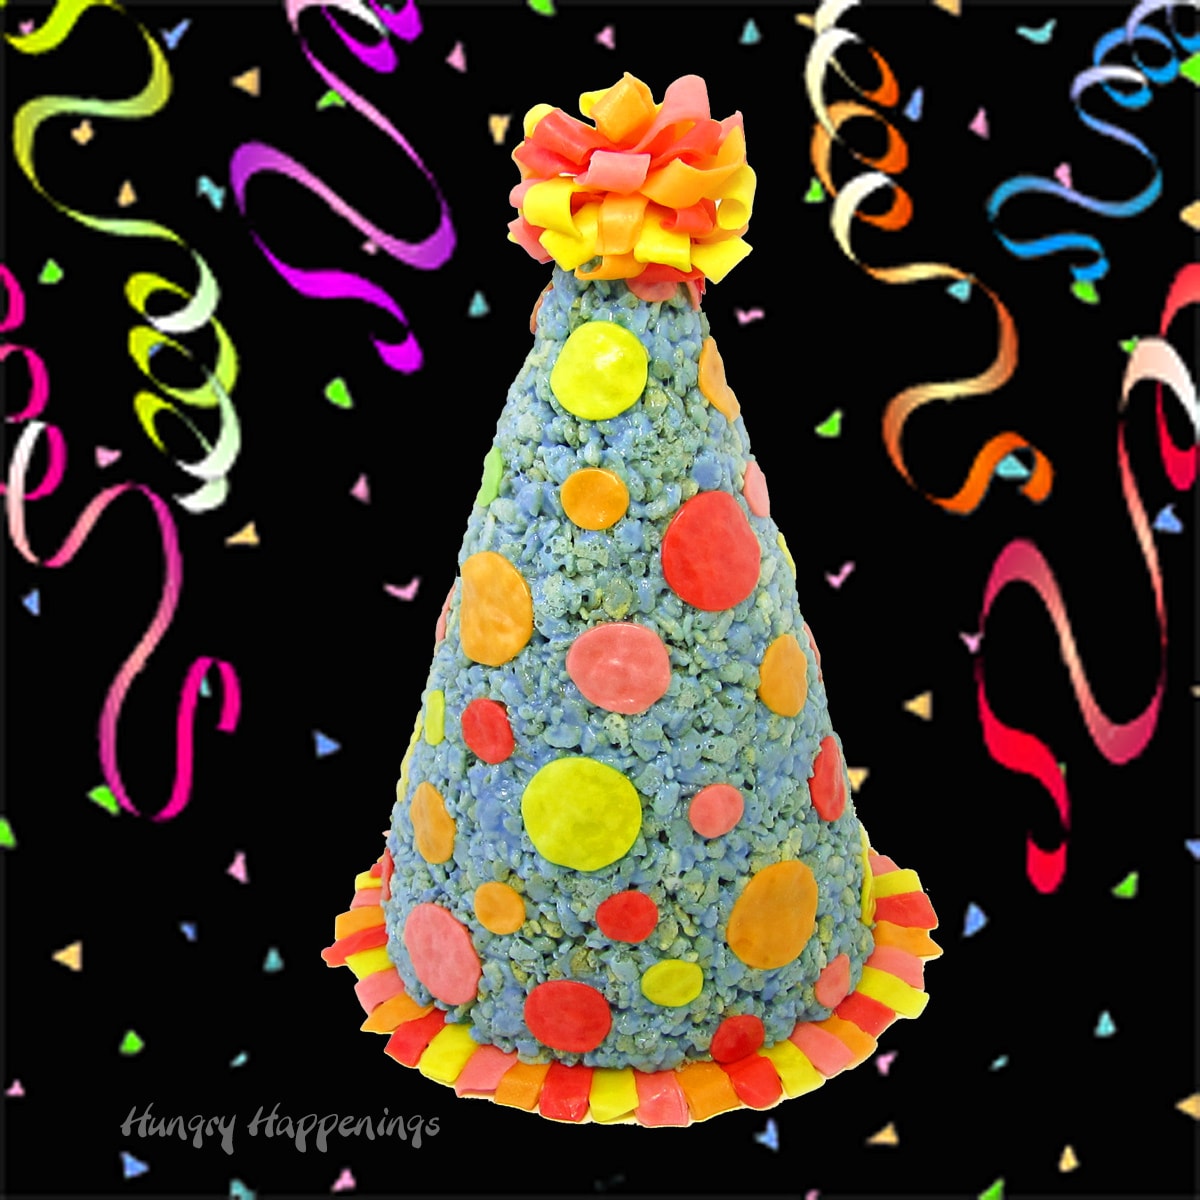
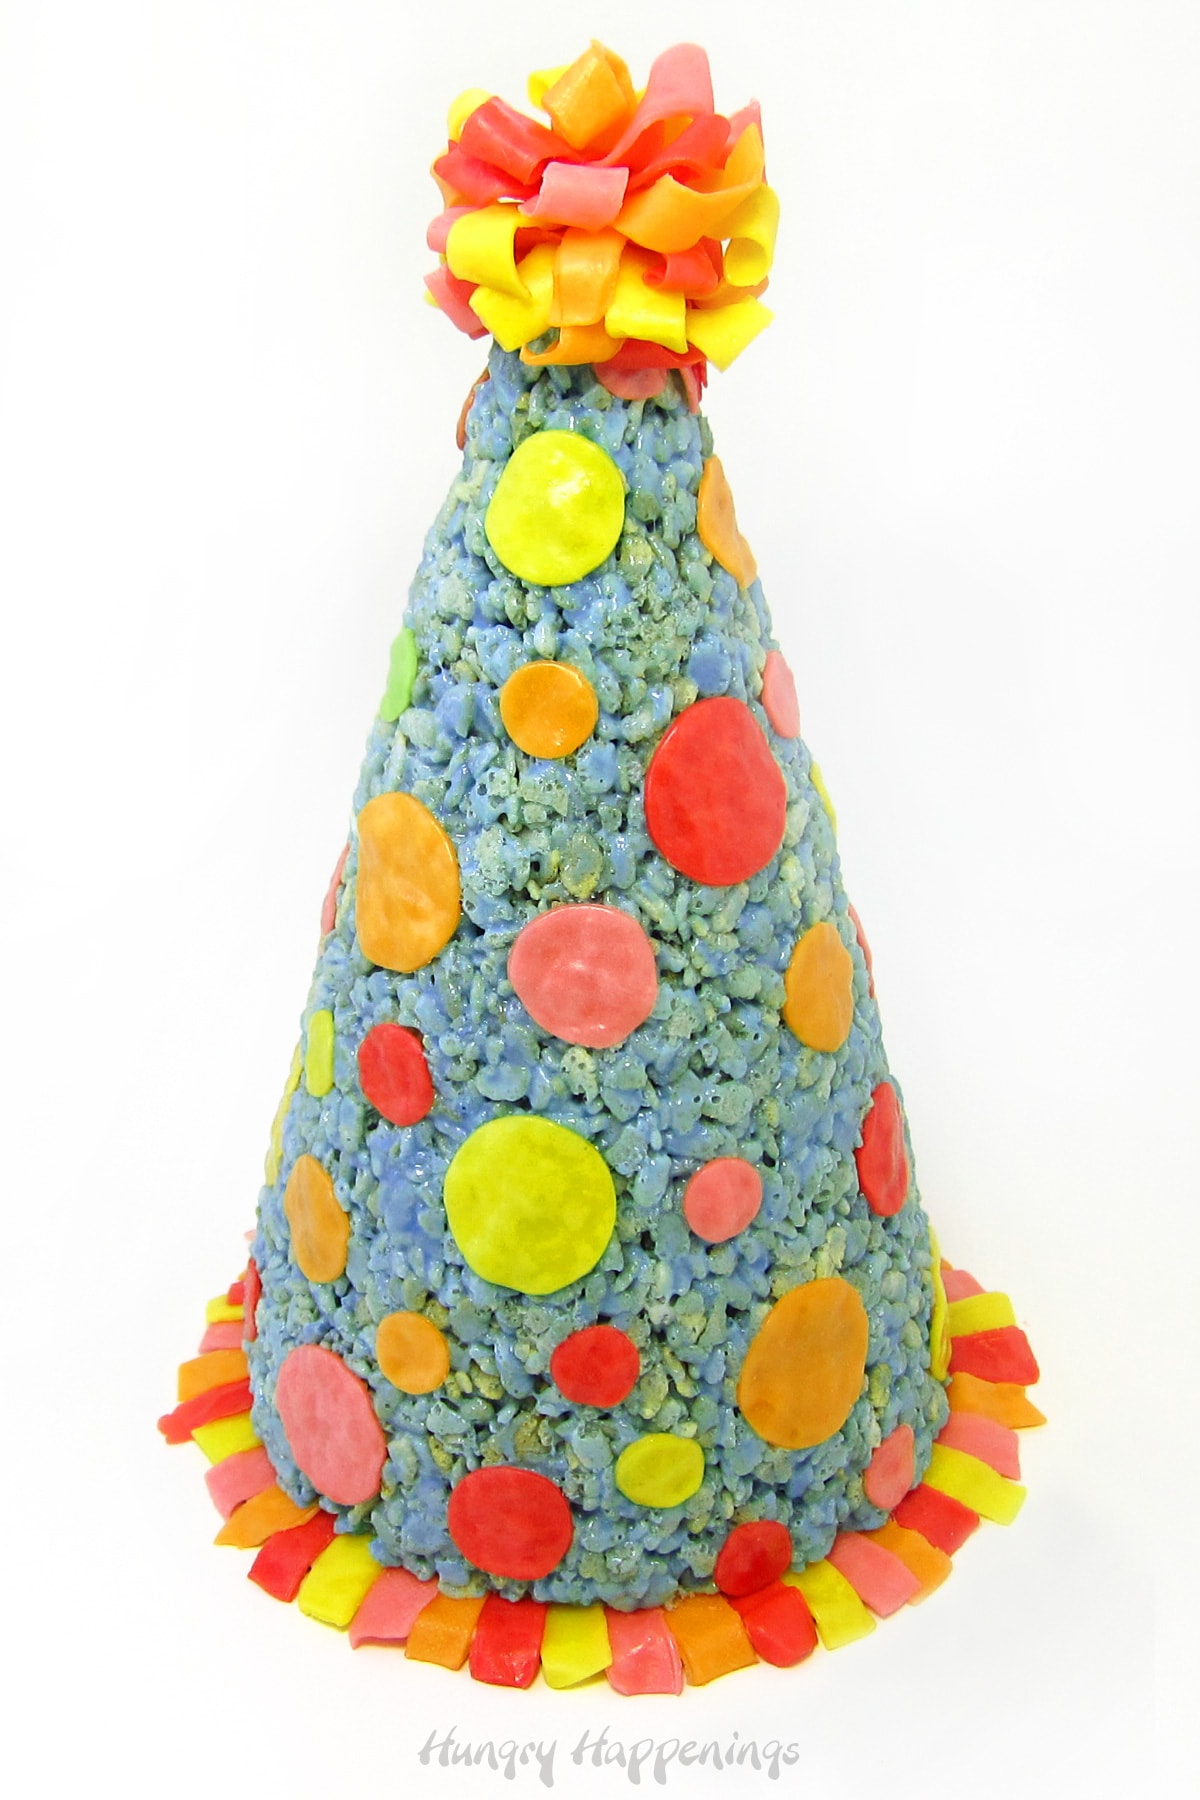
Celebrate a special day with a brightly colored Rice Krispie Treat Birthday Hat. This show-stopping dessert is easy to make and looks great.
If you are looking for a show-stopping dessert to make for a birthday party, make this festive birthday hat using Rice Krispie Treats and Starburst Fruit Chews.
Crafting the birthday hat out of marshmallow cereal treats is easy. You'll add a little bit of white chocolates to a traditional rice crispy treat recipe in order to give it more stability
To keep the decorations easy, I simply flattened out starburst fruit juice and cut them into shapes to make polka dots fringe and ribbons for my hat.
If you prefer, you could decorate your fat using modeling chocolate or fondant. Either way, this birthday dessert is sure to be a hit at your party.
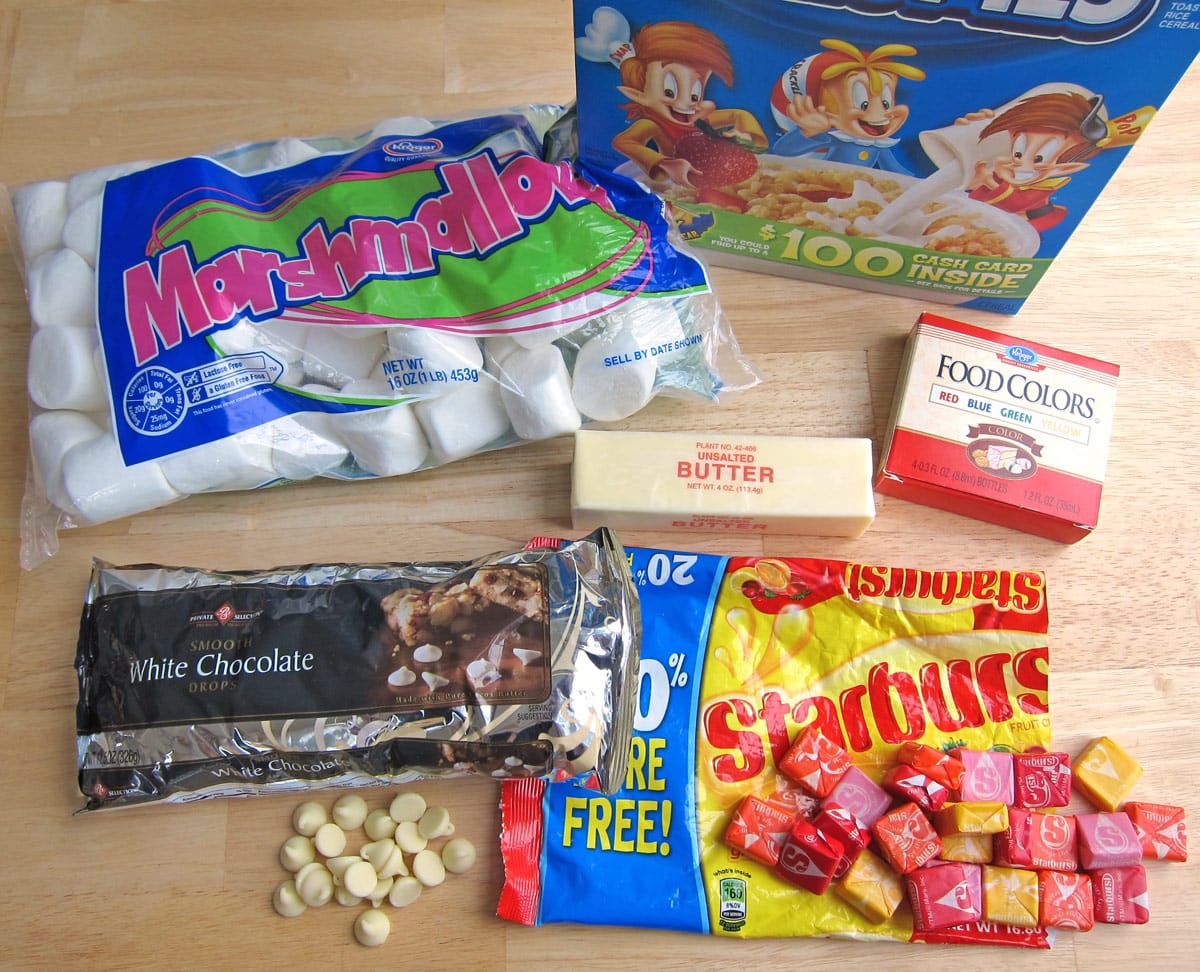
Ingredients
Decorations:
50-60 Starburst Fruit Chews - You can also use Airhead Taffy, salt water taffy, or modeling chocolate to decorate the birthday hat.
White Chocolate Rice Krispie Treats:
1 cup white chocolate chips
3 tablespoons butter
10 ounces marshmallows
6 cups Rice Krispies cereal
blue food coloring
Supplies
rolling pin - A non-stick fondant roller works best but a wooden rolling pin will work too.
round cookie cutters - ½-inch, 1-inch, and 1 ½-inch
pizza wheel or knife
6" round cake board (or cut a piece of cardboard and cover with tin foil)
Food-handling gloves, - These are optional but very useful.
toothpick
Instructions
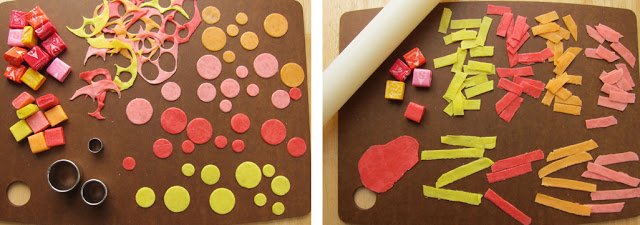
Cut the candy decorations.
Prepare your decorations first by heating one or two Starburst Fruit Chews in the microwave on defrost or lowest setting for 5-7 seconds, flipping them over halfway through the cycle.
Flatten the candy slightly then roll it out thin using a rolling pin. Note: If you heat several candies at once, by the time you get to roll them all out, they aren't soft anymore.
Use up to three different-sized round cookie cutters to cut polka dots out of 20 flattened candies. I was able to get three different-sized dots out of each candy using ½-inch, 1-inch, and 1 ½-inch round cutters.
Use a pizza wheel or sharp knife to cut ¼" wide strips out of the remaining candies. Then cut 6 of each of the four color strips (yellow, pink, orange, red) in half.
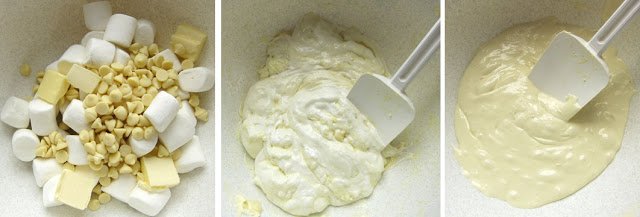
Melt the butter, marshmallows, and white chocolate.
In a microwave-safe bowl heat white chocolate chips, butter, and marshmallows on high for 1 minute. Let the bowl rest in the warm microwave for 3 minutes. Then, remove the bowl and stir.
Return to microwave and heat for 45 seconds. Let the bowl rest, and then stir.
If the marshmallows and chocolate aren't completely melted, return to microwave and heat for 15-second increments, stirring after each, until melted.
Alternatively, you can also melt the butter, marshmallows, and white chocolate in a saucepan set over low heat on the stove stirring often until 75% of the marshmallows and chips have melted. Remove the pan from the stove and let it sit for 3 minutes then stir until melted and smooth.
DO NOT overheat or your Rice Krispie Treat will be too hard.

Add blue coloring.
Reserve two tablespoons of the melted marshmallows for the next step.
Add drops of blue food coloring into the marshmallows and stir until you get a vibrant blue color. Add more coloring until you reach the desired shade.
Mix the blue marshmallows into the Rice Krispies cereal until well blended.
Allow to cool while you do the next step.

Add the candy fringe.
I chose to add the candy fringe to the cake board instead of the Rice Krispie Treat hat. When I lifted the hat off the board to cut it and serve it, the candy stuck to the hat which was perfect!
Spread about a tablespoon of the marshmallow mixture around the edge of your cake board.
Press a short strip of candy into the marshmallow, allowing it to hang over the edge by about half an inch.
Set another candy, overlapping slightly, next to the first piece. Continue to go around the entire board. Add about a tablespoon of marshmallow to the center of the board.
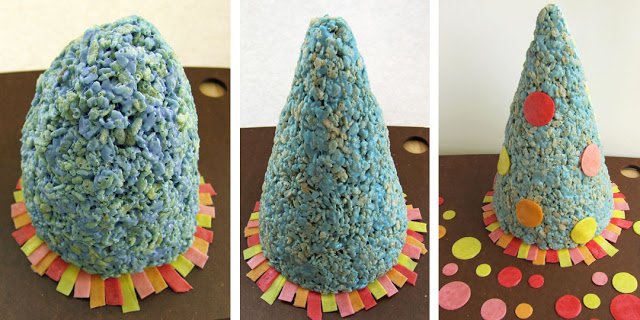
Decorate the birthday hat.
Scoop all of the rice krispie mixture out of the bowl and begin to form it into a cone (This is where I like to wear food-handling gloves.)
Set the mix onto the center of the candy-covered cake board. Press it down and use your hands to smooth out the bottom edge. Shape it into a nice pointed cone.
Decorate the hat by pressing the candy polka dots onto the cone.
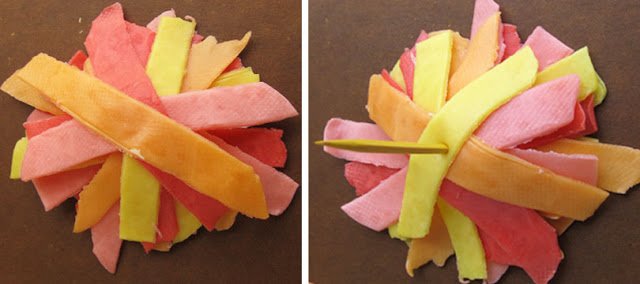
Make a candy pom pom.
Use the remaining ¼" wide strips to make a pom pom for the top of the hat. Layer the strips crisscrossing each other in a circular pattern until you have about an inch-tall pile of candy.
Skewer through the center of the pile with a toothpick.
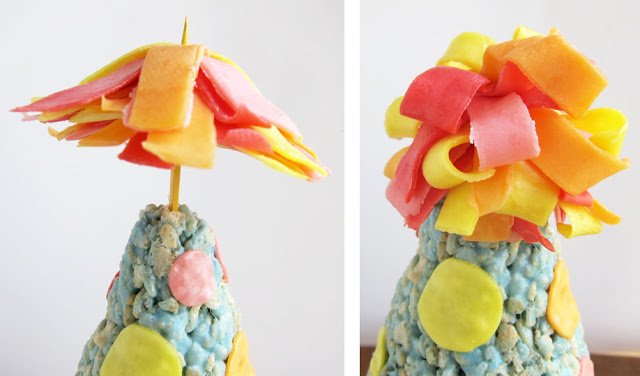
Attach the pom pom to the hat.
Press the toothpick into the top of the hat until the bottom strip of candy touches the hat.
Use your fingers to curl up the ends of each strip of candy, bending them slightly to form a rounded pom pom.
You'll notice the candies on the left haven't been curled, yet.
Tips
You can make this Rice Krispies Treat Birthday Party Hat a day or two ahead of your party. Keep it covered at room temperature. If you place it in a tall popcorn tin, it will stay fresh for up to a week.
To serve the hat, we just turned it on its side and cut round slices, then cut those into smaller pieces. The candy fringe on the bottom of the birthday hat stuck to the hat, not the board which was great.
Related Recipes
If you are looking for more treats to go along with this festive Birthday Hat Rice Krispie Treat, be sure to check out these other Birthday Party Recipes.

A bright blue Rice Krispie Treat party hat decorated with brightly colored candy polka dots, fringe, and a pom pom. This is a fabulous dessert for a birthday party.
- 50-60 Starburst Fruit Chews
- or use Airhead Taffy, salt water taffy, or modeling chocolate
- 1 cup white chocolate chips
- 3 tablespoons salted butter
- 10 ounces marshmallows
- 6 cups Rice Krispies cereal
- blue food coloring
-
Soften two Starburst Fruit Chews in the microwave on the lowest setting for 5-7 seconds at a time.
-
Then flatten them out and cut them into circles to create polka dots using ½-inch, 1-inch, and 1 ½-inch round cutters. You should get three of these sized circles out of each candy.
-
Continue to heat and soften the candies and cut more circles. You'll need about 60 or so.
-
Use a pizza wheel or sharp knife to cut ¼" wide strips out of the remaining candies. Then cut 6 of each of the four color strips (yellow, pink, orange, red) in half.
-
In a microwave-safe bowl heat white chocolate chips, butter, and marshmallows on high for 1 minute. Let the bowl rest in the warm microwave for 3 minutes. Then, remove the bowl and stir.
-
Return to microwave and heat for 45 seconds. Let the bowl rest, and then stir.
-
If the marshmallows and chocolate aren't completely melted, return to microwave and heat for 15-second increments, stirring after each, until melted.
-
Alternatively, you can also melt the butter, marshmallows, and white chocolate in a saucepan set over low heat on the stove stirring often until 75% of the marshmallows and chips have melted. Remove the pan from the stove and let it sit for 3 minutes then stir until melted and smooth.
-
DO NOT overheat or your Rice Krispie Treat will be too hard.
-
Reserve two tablespoons of the melted marshmallows for the next step.
-
Add several drops of blue food coloring into the marshmallows and stir until you get a vibrant blue color. Add more coloring as needed. The cereal will mute the color so make it bright.
-
Mix the blue marshmallows into the Rice Krispies cereal until well blended.
-
Allow to cool while you do the next step.
-
Spread about a tablespoon of the marshmallow mixture around the edge of your cake board.
-
Press a short strip of candy into the marshmallow, allowing it to hang over the edge by about half an inch.
-
Set another candy, overlapping slightly, next to the first piece. Continue to go around the entire board. Add about a tablespoon of marshmallow to the center of the board.
-
Scoop all of the rice krispie mixture out of the bowl and begin to form it into a cone.
-
Set the mix onto the center of the candy-covered cake board. Press it down and use your hands to smooth out the bottom edge. Shape it into a nice pointed cone.
-
Decorate the hat by pressing the candy polka dots onto the cone.
-
Use the remaining ¼" wide strips to make a pom pom for the top of the hat. Layer the strips crisscrossing each other in a circular pattern until you have about an inch-tall pile of candy.
-
Skewer through the center of the pile with a toothpick.
-
Press the toothpick into the top of the hat until the bottom strip of candy touches the hat.
-
Use your fingers to curl up the ends of each strip of candy, bending them slightly to form a rounded pom pom.
Storage
You can make this Rice Krispies Treat Birthday Party Hat a day or two ahead of your party. Keep it covered at room temperature. If you place it in a tall popcorn tin, it will stay fresh for up to a week.
Serving
To serve the hat, we just turned it on its side and cut round slices, then cut those into smaller pieces. The candy fringe on the bottom of the birthday hat stuck to the hat, not the board which was great.

- Banana Split Bars – A Fun and Easy Summer Dessert - March 4, 2026
- Pineapple Fudge (No Candy Thermometer Needed!) - March 4, 2026
- No-Bake Peanut Butter Pie Recipe - March 3, 2026
restaurants in the hamptons says
This is perfect for children's parties.
MiaB says
Another WOW creation!!! So impressed with how cute this is 🙂 Thanks for sharing this with us at Sharing Saturday. Hope to see you again next week.
~MiaB
www.mamamiasheart2heart.com
Tanya Anurag says
WOW... I can eat that cap right away. Pinning it 🙂
We have a link-up party going on - Tea Time Thursdays @ Kreative Korner. I would really appreciate if you'd link up some of your awesome posts there. Hope to see you at the party.
http://tanyaanurag.blogspot.com/2011/08/tea-time-thursdays-2-and-features.html
Alexis Preatori says
I thought the decorations at the bottom are fake. I want to try this as a treat for my kids on weekends. Thanks for sharing this delicious dessert.Caterers In New York
Hollie - TheSevenYearCottage.com says
What a cute idea!
sugarswings says
love this! pinning it now 🙂
Alison@Oopsey Daisy says
This is incredible! It's so bright and happy--and it really looks like a party hat!!
Beth @ Hungry Happenings says
Happy Birthday Chris. I do hope someone makes this for your special day!
I felt the same way about the Starburst. I only used them because I'd seen them used on cupcakes and thought I needed to see how they worked. I like your suggestion to use fruit leather. I think it would work well and taste great - the only negative will be that the colors wont be as vibrant. More colorful fruit roll-ups would make great polka dots, but I'm not sure they'd be stiff enough to make the pom pom. Gumdrops would definitely work well for the polka dots and a big gumdrop could be set on top of the hat for a pom pom.
You'll have to let me know how your family makes your birthday hat:)
~Chris says
Funny timing since today is my birthday. Hmmmm... maybe when I get home from work, I'll INSIST that everyone make me one of these. I love Rice Crispie Treats! LOL
As much as I like the Starburts (never think to buy them but always score some off a friend's kid around Halloween), I don't think it would occur to me to use those (or Airheads since I'v enever had them) for the decorating. I probably would have gone with fruit leather. I also sometimes get spice drops and cut slices off of those - roll them out more if needed.
Very cute!!! 🙂